Showing posts with label i. Show all posts

50 Hour Service I got Gongoozled

Monday, November 14, 2016

I did the first 50 hour service today at 54.7 hours.  This required engine oil and filter change and three diesel filters. I havent needed to top up the engine oil in the first 50 hours so it seems its not using any. :-)

This was the water and gunk collected from the 2 pre-filters.
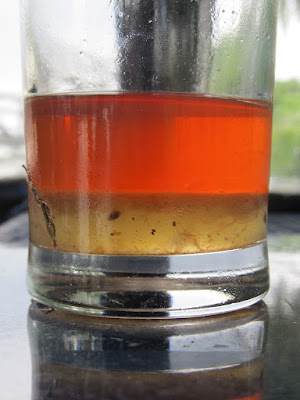

Not actually a great amount so thats pleasing.  The service book says to do it at 125 hours then every 125 hours but I think I will stick with doing it ever 50 hours.  Its easy to do anyway

The alternator belts needed adjusting the lower one more than the upper one.  I run out of time today and have still to do the tappets but the engine sounds pretty quiet, indeed more so after the oil and filter change. The oil was in very good condition just a very light charcol colour.

Engine mountings we checked and found to be tight and a general check of the engine found nothing loose.

I checked and toped up the oil in the generator.   This is using a bit of oil, but it runs a lot more than the engine and a lot faster, 3000rpm where as the engine seldom goes over 1200rpm.

All that done I needed to empty the toilet tank and fill with water so it was time to take the boat out solo.  A quick blast up the river to turn around and then off to the services area.

Avalon on the service point

Mission accomplished!  It takes a little over 2 hours to fill the tank, so I set it filling after doing the pump out which takes 10 minutes. 

I decided to moor on the town moorings instead of going back to the home mooring.  Inspired by my new found confidence I  decided to see if I could moor in between a NB and plastic cruiser a gap of about 70.  As usual this sort of manoeuvre attracts an audience.  A very slow and careful approach saw me in to a round of applause from the on lookers.  So now I have officially been Gongoozled.
Read More..

Perhaps I shouldnt discuss Politics

Monday, October 10, 2016

...but I will to this extent...


Learn all you can.

Think for yourself.

Vote.
Read More..

Shall I Cut the Deck

Friday, September 16, 2016

My plan is to get the boat out of the basement before putting on the deck plywood so it will be somewhat easier to handle and slightly lighter. But, there isnt any reason not to go ahead with doing the rough cutting and fitting. After a bit of sketching of how to cut the pieces, it seemed the only way to get the front deck pieces out of one sheet of plywood was to use the factory edge down the centerline of the boat starting about 18" in from the end. The opposite side piece would use the other side of the sheet but the sheet would be flipped over to fit the mirror image piece. I plan on having a natural wood finish on the deck using just the plywood but with a paint graphic band down the center to hind the seam. Luckily, the plywood has veneer that looks very similar in grain and color on both sides of the sheet. The first sheet of deck plywood is not supposed to stop at the dash or any frame, but continue as far as possible along the carling and sheer as not to create a weak spot. After positioning the full sheet down the centerline of the boat and clamping it in place, a line was traced on the underneath side to show where to cut it. A 1/4" thick scrap piece was used to offset the pencil mark to allow at least a 1/4" overhang at all edges. Then the sheet was taken off the boat and set up in my shop for cutting with a jig saw. I quit for the day at that point to sleep on it before cutting.


Some blue tape was put beside the cut line which minimized any tear out of the veneer and helped visualize the line to be cut. The firse piece went well as did the second. Putting them both on the boat confirmed that the color and grain look very similar between the two halves.


The next task was the back halves. The first one was marked and was left overnight just in case there was something I was overlooking. Nope, cut it and it fit. Tried it on the other side and it fit there too. So I used it as a pattern for the other side. I left overlaps between the front and back pieces to give me some adjustment when finally glued and attached.
Read More..

Chines Part I

Thursday, September 15, 2016


After learning of Teds broken chine when attempting the bend, I decided to laminate the chines to make for easy bending. So I cut my chine material to rough length, about 12, and then ripped them to 3/8" thick. The cutoff pieces were about 1/4+" thick. I then soaked all four pieces in the 4" soaking pipe, stem end first, for a couple of days to noodle them up a bit.


I borrowed the soaking pipe from Ted. By hanging it in the stairwell, it can be loaded with long pieces of wood, filled with water and not get in anybodys way. Also, its a lot easier to keep the water in it if its not horizontal.


After soaking, the chine material was put on the boat and bent into place. The two layers of thin material bent easily into position on the frames and up against the stem. They were left to dry for a couple of days while I did other things like work for a living.


When it came time to figure out how to fit the chines at the stem, I decided that without having the shears in place, it was hard to judge how much twist to put into them. I decided that procrastination was a good approach to the question, and bending and installing the shears first might answer the question or provide enough time to figure it out.

The picture shows the chines held in place and the one layer of the shears bent and clamped in place. On the left is a previously bent shear just resting in place waiting for the glue-up to take place.
Read More..

Hang on a Minute I Gotta Drain It

Wednesday, August 24, 2016

There comes a time when the pressure builds and you just gotta do something that you have put off too long....like putting drain plugs in a boat. The thought of drilling big holes in the transom scared the heck out of me, but I couldnt put it off any longer. After contemplating and procrastinating, I reviewed the cross-section of the transom to determine the lowest point in the transom I could drill a perpendicular hole and not breach the plywood bottom planking. I also looked at photos on this blog to see where I had located screws to hold on the bottom planking near the keel as I did not want to drill into one.


I then decided to bore a guide hole in a 2x6 and clamp it to the inside of the transom and another scrap board to the outside to prevent break-out when I drilled through. The first hole when well, and then I moved to the other side of the keel and located the hole and drilled another pilot hole in the 2x6 in the right location. The pictures show the second hole about to be drilled.


I tried to insert the drain sleeve into the hole from the outside, but it was too snug. I used a rotary drum sander to open it up slightly until the sleeve would ease in. Then I marked the sleeve with a Sharpie to leave it about 1/8" long. I removed the sleeve and a tubing cutter was used to cut it off. The sleeves were filed slightly around the outside to provide some fine scratches to ensure a good bite. Epoxy was mixed and coated the inside of the holes. Then some high density #404 filler added to thicken it up and smeared into the holes. The sleeves were inserted fully from the outside and I rigged up a bolt with large washers in each one to make sure they were held firmly in the hole while the epoxy cured.

The next day, I used a small ball peen hammer and slowly peened the brass sleeve over to provide a flange on the inside of the boat. The drain plugs fit in nicely and its all good.


Read More..

A Kind Of Hush

Wednesday, May 18, 2016

I wouldnt say our engine is particularly noisy, indeed as its getting a few hours on it it seems to be getting a bit quieter.  We had no soundproofing under the 18mm deck floor.  We have a local firm  


who specialise in acoustic and thermal insulation.  Ive know the owner for many years and contacted him for some advice.  He offered a 43mm laminated foam panel with 10kg man made lead type core wrapped in heat reflective foil as a solution.

The process started a few weeks ago with me making and supplying templates as TAP will make to exact size rather than just buying it in slabs as is the norm from chandlers.

 Starboard floorboard underside

Last week I got a call to say the panels were ready and today I fixed them under the floors.  The backing is self adhesive but I decided to add some mechanical fixing too.

Engine hatch before

Engine hatch after

I did some dB checks with the trusty iPhone db meter yesterday while we were on the move and will do some more tomorrow when we move again.  I have to say though just with the engine on tick over there is a noticeable difference.  Of course the engine is not the only noise source, a fair amount of prop against water is present too so a static test is not really valid.

On another noise note Ive had an annoying metallic buzz at 1050rmp and again at 1900rpm which can be heard in this video.


I think Ive now solved it.  Theres a plate covering the turbo and I think this is the cause of the problem.


I have put it back with a few dollops of high temperature silicone in the hope this will stop the vibration.

RESULTS

First off the vibration has stopped, so thats cured.

I wish I had done some more noise comparison tests at different RPM as the difference on general cruise RPM is measurably better:-

Before
After
But this really isnt the whole story as I later found out.  The sound proofing actually works better the louder the engine gets, so as the RPM and prop noise builds, the sound insulation damps more of it out, so its much much quieter when the RPM is higher and the prop thrashing more.  Now its much quieter when its working harder something I didnt expect.


Another test I never considered measuring was the generator.  The genny is already cocooned but with the new under deck sound insulation the difference is very noticeable.  I will be going back to TAP to see if they can help with quieting then Mikuni CH boiler.


So in conclusion:-  Well worth installing.

 
Read More..